sse 单向信息流
以前只接触过websocket, 或者mqtt这种长时间双向同步的web协议, 没想到竟然还有sse协议(server sent events), 用于从服务端单向通过http向web端发送信息流.
世界变化快, 以前没人管过sse协议. ai大模型时代开启, 在chatgpt这种类似的对话场景, 到处都是sse协议的应用. 大模型预测速度比较慢, 需要及时将预测输出的文本持续的展示给用户, sse就派上用场了. 一字一句的往外输出, 看起来还挺高端. websocket协议其实更牛逼, 但是处理开发起来毕竟麻烦了一些. sse协议是原生的html协议, 能够复用许多技术栈.
sse-starlette
get your hands dirty, 先用 python 测试起来
https://github.com/sysid/sse-starlette
https://github.com/sysid/sse-starlette/blob/main/sse_starlette/sse.py
https://pypi.org/project/sse-starlette/0.3.0/
pip install sse-starlette
import asyncio
import uvicorn
from starlette.applications import Starlette
from starlette.routing import Route
from sse_starlette.sse import EventSourceResponse

async def numbers(minimum, maximum):
    for i in range(minimum, maximum + 1):
        await asyncio.sleep(0.9)
        yield dict(data=i)

async def sse(request):
    generator = numbers(1, 5)
    return EventSourceResponse(generator)

routes = [
    Route("/", endpoint=sse)
]

app = Starlette(debug=True, routes=routes)

if __name__ == "__main__":
    uvicorn.run(app, host="0.0.0.0", port=8000, log_level='info')
python3 sse.py
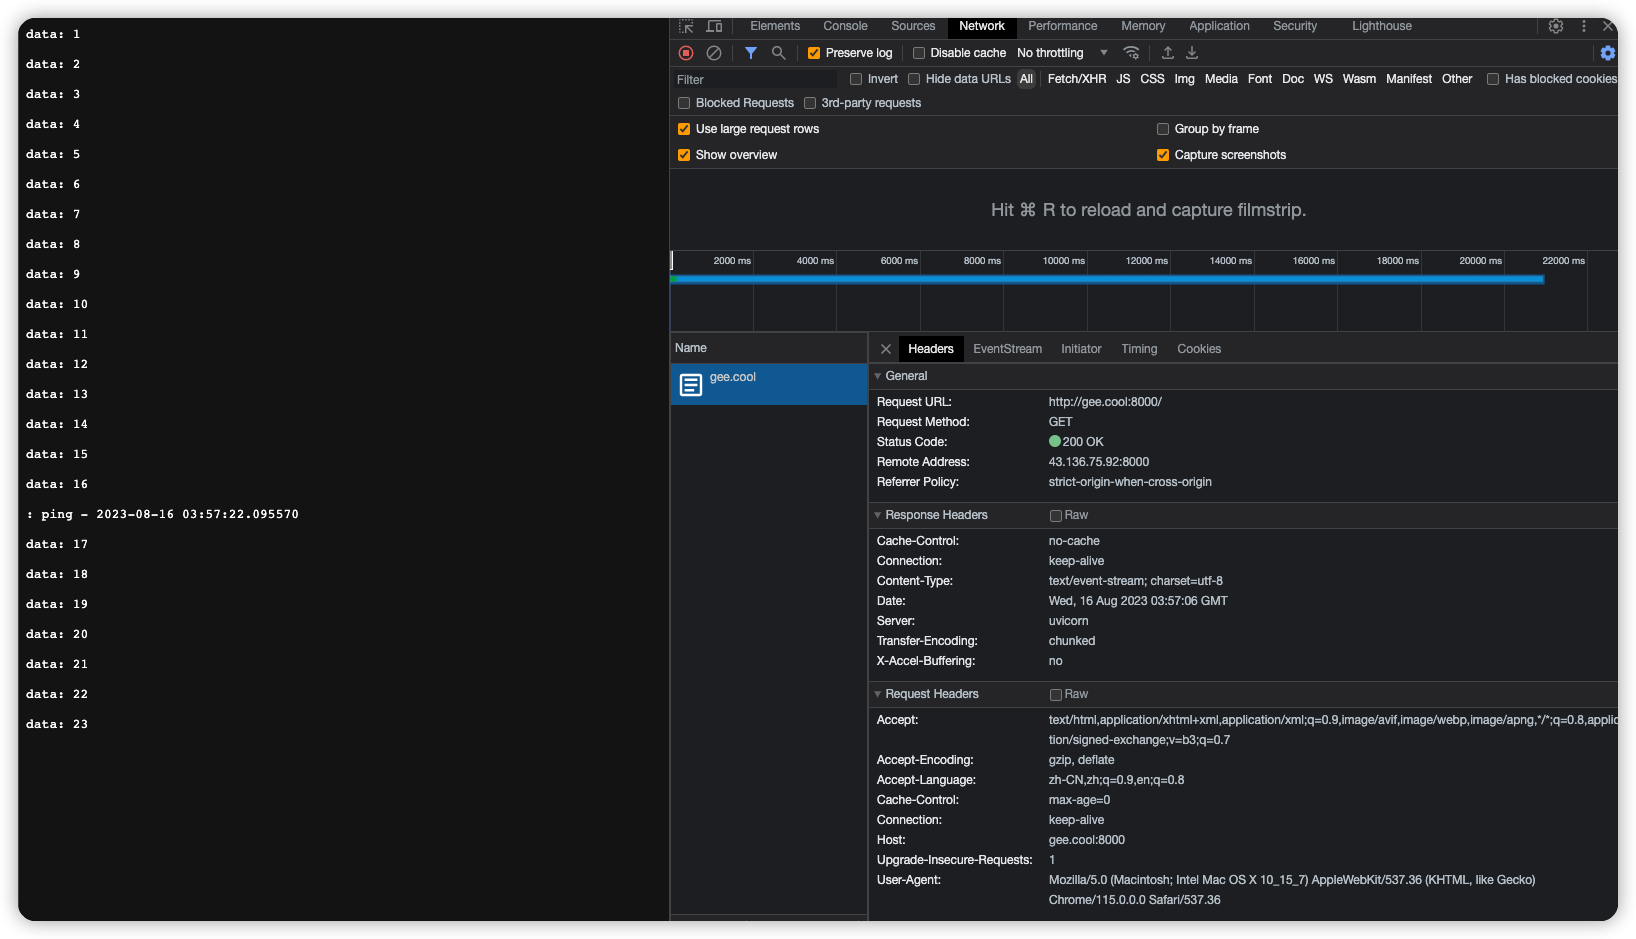
web访问, 持续不停的对外输出文本.
http 的 content type为 text/event-stream; charset=utf-8
每隔15秒有一行记录: ping - 2023-08-16 03:57:18.252106, :开头代表这是comment评论, 用作heart beat心跳, 记得可以配置用户不可见的文本.
starlette
starleet 不只提供了sse, 还提供了一堆asgi的工具, 比如websocket也有.
https://github.com/encode/starlette
Starlette is a lightweight ASGI framework/toolkit, which is ideal for building async web services in Python.
It is production-ready, and gives you the following:
- A lightweight, low-complexity HTTP web framework.
- WebSocket support.
- In-process background tasks.
- Startup and shutdown events.
- Test client built on httpx.
- CORS, GZip, Static Files, Streaming responses.
- Session and Cookie support.
- 100% test coverage.
- 100% type annotated codebase.
- Few hard dependencies.
- Compatible with asyncio and trio backends.
- Great overall performance against independent benchmarks.
from starlette.applications import Starlette
from starlette.responses import JSONResponse
from starlette.routing import Route


async def homepage(request):
    return JSONResponse({'hello': 'world'})

routes = [
    Route("/", endpoint=homepage)
]

app = Starlette(debug=True, routes=routes)
Then run the application using Uvicorn:
$ uvicorn example:app
sse 一些概念的说明
msdn 官方定义 Server-sent events
https://developer.mozilla.org/en-US/docs/Web/API/Server-sent_events
Traditionally, a web page has to send a request to the server to receive new data; that is, the page requests data from the server. With server-sent events, it's possible for a server to send new data to a web page at any time, by pushing messages to the web page. These incoming messages can be treated as Events + data inside the web page.
sysid blog: Server Sent Events
介绍了许多细节点, 包括sse与websocket的对比, 看完大概就了解了.
- sse其实是html标准定义的;
- sse通过http协议沟通;
- http能支持sse, 不过最多只能打开6个请求; http2默认能打开100个请求, 并且支持配置.
- 当连接中断的时候, 服务端和客户端都能被通知到.
- sse支持loadbalancing
- websocket并不是http协议, 处理load balance负载均衡也非常麻烦
https://sysid.github.io/server-sent-events/
websocket 与 sse 的对比
If you need bi-directional realtime features with high volume and low latency, Websocket is your choice.
If you need to deliver realtime information to many clients, but you can live with the HTTP Request/Response model to trigger actions, Server Sent Events (SSE) are a powerful contender. SSE is a mechanism that allows the server to asynchronously push the data to the client once the client-server connection is established. The client subscribes to the server data via an Event Source.
sse 的基本介绍
Server sent events are a part of the HTML standard, not HTTP1. They define a protocol that is invisible to the HTTP layer, and does not disrupt any of the lower layers.
At it’s core, SSE is just a Content-Type header that informs the client that the response will be delivered in pieces. It also alerts the browser that it should expose each piece to the code as it arrives, and not wait for the full request, much like WebSocket’s frames2.
On the browser this is implemented with the easy-to-use EventSource interface in client side code:
var source = new EventSource('updates.cgi');
source.onmessage = function (event) {
  alert(event.data);
}
Why SSE?
- SSE is based on HTTP, so it has a natural fit with HTTP/2. This establishes an efficient transport layer based on multiplexed streams, out of the box. The client only needs one connection to get various data feeds (no magic limit of 6!).
- The client and server are informed when the connection drops, there is no special protocol needed.
- Reliability: Maintaining an unique Id with messages the server can see that the client missed a number of messages and send the backlog of missed messages on reconnect.
- Proxy issues are much easier to handle than with Websockets, after all you are talking plain HTTP.
- Load Balancing also just works as with regular HTTP sessions. Nothing special. Load Balancing of websockets can become very complicated and you have to roll your own solution.
- SSL: Tick in the box.
Features like small messages size and persistent open connections from client to server are nowadays provided by HTTP/2 via header compression and de-duplication.
WebSocket is basically a different protocol for delivering data3. It is cannot be multiplexed over HTTP/2 connections (it doesn’t really run on top of HTTP at all). Implementing custom multiplexing both on the server and the client is complicated.
sse 服务注意点
Server Side code is not complicated to implement. One pitfall to look out for: Proxy servers are known sometimes to drop HTTP connections after a short timeout. To protect against that, you can include a comment line (one starting with a ‘:’ character) every 15 seconds or so.
proxy server 转发服务器在http请求长时间没有信息的时候, 会把连接扔掉, 因此需要提供hearbeat信息用于保持连接. 原来如此, 协议本身是支持长时间连接的, 只是一路上的各种nginx之类的proxy server的特性导致需要heartbeat.
html 关于sse 的协议
https://html.spec.whatwg.org/multipage/server-sent-events.html#the-eventsource-interface
event streams的一些定义和说明
The default event type is "message".
Event streams are always decoded as UTF-8. There is no way to specify another character encoding.
Event stream requests can be redirected using HTTP 301 and 307 redirects as with normal HTTP requests. Clients will reconnect if the connection is closed; a client can be told to stop reconnecting using the HTTP 204 No Content response code.
web 端需要使用 EventSource去接收处理信息.
Using this API consists of creating an EventSource object and registering an event listener.
var source = new EventSource('updates.cgi');
source.onmessage = function (event) {
  alert(event.data);
};
The EventSource interface
[Exposed=(Window,Worker)]
interface EventSource : EventTarget {
  constructor(USVString url, optional EventSourceInit eventSourceInitDict = {});

  readonly attribute USVString url;
  readonly attribute boolean withCredentials;

  // ready state
  const unsigned short CONNECTING = 0;
  const unsigned short OPEN = 1;
  const unsigned short CLOSED = 2;
  readonly attribute unsigned short readyState;

  // networking
  attribute EventHandler onopen;
  attribute EventHandler onmessage;
  attribute EventHandler onerror;
  undefined close();
};

dictionary EventSourceInit {
  boolean withCredentials = false;
};
The Last-Event-ID header
The Last-Event-ID` HTTP request header reports an EventSource object's last event ID string to the server when the user agent is to reestablish the connection.
event stream 的格式解析
This event stream format's MIME type is text/event-stream.
The event stream format is as described by the stream production of the following ABNF, the character set for which is Unicode. [ABNF]
stream        = [ bom ] *event
event         = *( comment / field ) end-of-line
comment       = colon *any-char end-of-line
field         = 1*name-char [ colon [ space ] *any-char ] end-of-line
end-of-line   = ( cr lf / cr / lf )

; characters
lf            = %x000A ; U+000A LINE FEED (LF)
cr            = %x000D ; U+000D CARRIAGE RETURN (CR)
space         = %x0020 ; U+0020 SPACE
colon         = %x003A ; U+003A COLON (:)
bom           = %xFEFF ; U+FEFF BYTE ORDER MARK
name-char     = %x0000-0009 / %x000B-000C / %x000E-0039 / %x003B-10FFFF
                ; a scalar value other than U+000A LINE FEED (LF), U+000D CARRIAGE RETURN (CR), or U+003A COLON (:)
any-char      = %x0000-0009 / %x000B-000C / %x000E-10FFFF
                ; a scalar value other than U+000A LINE FEED (LF) or U+000D CARRIAGE RETURN (CR)
Event streams in this format must always be encoded as UTF-8. [ENCODING]
Lines must be separated by either a U+000D CARRIAGE RETURN U+000A LINE FEED (CRLF) character pair, a single U+000A LINE FEED (LF) character, or a single U+000D CARRIAGE RETURN (CR) character.
Since connections established to remote servers for such resources are expected to be long-lived, UAs should ensure that appropriate buffering is used. In particular, while line buffering with lines are defined to end with a single U+000A LINE FEED (LF) character is safe, block buffering or line buffering with different expected line endings can cause delays in event dispatch.
readyState 状态
The readyState attribute represents the state of the connection. It can have the following values:
CONNECTING (numeric value 0)The connection has not yet been established, or it was closed and the user agent is reconnecting.OPEN (numeric value 1)The user agent has an open connection and is dispatching events as it receives them.CLOSED (numeric value 2)The connection is not open, and the user agent is not trying to reconnect. Either there was a fatal error or the close() method was invoked.
msdn web 关于 sse
https://developer.mozilla.org/en-US/docs/Web/API/Server-sent_events/Using_server-sent_events
- Creating an EventSource instance
const evtSource = new EventSource("ssedemo.php");
const evtSource = new EventSource("//api.example.com/ssedemo.php", {
  withCredentials: true,
});
- Listening for message events
evtSource.onmessage = (event) => {
  const newElement = document.createElement("li");
  const eventList = document.getElementById("list");

  newElement.textContent = `message: ${event.data}`;
  eventList.appendChild(newElement);
};
- Listening for custom events
evtSource.addEventListener("ping", (event) => {
  const newElement = document.createElement("li");
  const eventList = document.getElementById("list");
  const time = JSON.parse(event.data).time;
  newElement.textContent = `ping at ${time}`;
  eventList.appendChild(newElement);
});
fastapi sse
https://devdojo.com/bobbyiliev/how-to-use-server-sent-events-sse-with-fastapi
@app.get('/stream')
async def message_stream(request: Request):
    def new_messages():
        # Check if data in table
        results = engine.execute('SELECT count(*) FROM sensors_view_1s')
        if results.fetchone()[0] == 0:
            return None
        else:
            return True

    async def event_generator():
        while True:
            # If client was closed the connection
            if await request.is_disconnected():
                break

            # Checks for new messages and return them to client if any
            if new_messages():
                connection = engine.raw_connection()
                with connection.cursor() as cur:
                    cur.execute("DECLARE c CURSOR FOR TAIL sensors_view_1s")
                    cur.execute("FETCH ALL c")
                    for row in cur:
                        yield row

            await asyncio.sleep(MESSAGE_STREAM_DELAY)

    return EventSourceResponse(event_generator())
flask sse
https://flask-sse.readthedocs.io/en/latest/quickstart.html
flask自身不支持sse, 需要安装flask-sse依赖才行, 估计背后切换为异步的gevent了.flask自带的web server不支持异步, 因此要使用sse的话, 需要使用gunicorn之类的web server. 同时要使用sse, 还需要提供redis缓存.
Server-sent events do not work with Flask’s built-in development server, because it handles HTTP requests one at a time. The SSE stream is intended to be an infinite stream of events, so it will never complete.Gunicorn can work with gevent to use asychronous workers: see gunicorn’s design documentation.
You will also need a Redis server running locally for this example to work
$ pip install flask-sse gunicorn gevent
from flask import Flask, render_template
from flask_sse import sse

app = Flask(__name__)
app.config["REDIS_URL"] = "redis://localhost"
app.register_blueprint(sse, url_prefix='/stream')

@app.route('/')
def index():
    return render_template("index.html")

@app.route('/hello')
def publish_hello():
    sse.publish({"message": "Hello!"}, type='greeting')
    return "Message sent!"
$ gunicorn sse:app --worker-class gevent --bind 127.0.0.1:8000
<!DOCTYPE html>
<html>
<head>
  <title>Flask-SSE Quickstart</title>
</head>
<body>
  <h1>Flask-SSE Quickstart</h1>
  <script>
    var source = new EventSource("{{ url_for('sse.stream') }}");
    source.addEventListener('greeting', function(event) {
        var data = JSON.parse(event.data);
        alert("The server says " + data.message);
    }, false);
    source.addEventListener('error', function(event) {
        alert("Failed to connect to event stream. Is Redis running?");
    }, false);
  </script>
</body>
</html>
python sse 客户端
ssseclient-py
https://github.com/mpetazzoni/sseclient
pip install sseclient-py
import json
import pprint
import sseclient

def with_urllib3(url, headers):
    """Get a streaming response for the given event feed using urllib3."""
    import urllib3
    http = urllib3.PoolManager()
    return http.request('GET', url, preload_content=False, headers=headers)

def with_requests(url, headers):
    """Get a streaming response for the given event feed using requests."""
    import requests
    return requests.get(url, stream=True, headers=headers)

url = 'http://domain.com/events'
headers = {'Accept': 'text/event-stream'}
response = with_urllib3(url, headers)  # or with_requests(url, headers)
client = sseclient.SSEClient(response)
for event in client.events():
    pprint.pprint(json.loads(event.data))
测试正常, 每秒都有新数据输出.
如果远程服务器突然关掉, 出现如下报错
ChunkedEncodingError: ("Connection broken: InvalidChunkLength(got length b'', 0 bytes read)", InvalidChunkLength(got length b'', 0 bytes read))
看脚本内容非常简略, 就一个python文件实现了客户端, 主要操作就是与requests之类请求的返回进行交互.
https://github.dev/mpetazzoni/sseclient
其实难点反而是requests本身, 如何实现一个不停读取的binary stream.
class SSEClient(object):
    """Implementation of a SSE client.

    See http://www.w3.org/TR/2009/WD-eventsource-20091029/ for the
    specification.
    """

    def __init__(self, event_source, char_enc='utf-8'):
        """Initialize the SSE client over an existing, ready to consume
        event source.

        The event source is expected to be a binary stream and have a close()
        method. That would usually be something that implements
        io.BinaryIOBase, like an httplib or urllib3 HTTPResponse object.
        """
        self._logger = logging.getLogger(self.__class__.__module__)
        self._logger.debug('Initialized SSE client from event source %s',
                           event_source)
        self._event_source = event_source
        self._char_enc = char_enc

    def _read(self):
        """Read the incoming event source stream and yield event chunks.

        Unfortunately it is possible for some servers to decide to break an
        event into multiple HTTP chunks in the response. It is thus necessary
        to correctly stitch together consecutive response chunks and find the
        SSE delimiter (empty new line) to yield full, correct event chunks."""
        data = b''
        for chunk in self._event_source:
            for line in chunk.splitlines(True):
                data += line
                if data.endswith((b'\r\r', b'\n\n', b'\r\n\r\n')):
                    yield data
                    data = b''
        if data:
            yield data
sseclient
https://pypi.org/project/sseclient/
pip install sseclient
In [1]: from sseclient import SSEClient

In [2]: messages = SSEClient('http://sse.gee.cool:8000')

In [3]: for i in messages:
    print(i.event, i.data, i.id)
测试发现会不断重复请求, 在stream结束后, 仍会开启下一轮.
纯异步版本 aiohttp-sse-client
https://github.com/rtfol/aiohttp-sse-client
from aiohttp_sse_client import client as sse_client

async with sse_client.EventSource(
    'https://stream.wikimedia.org/v2/stream/recentchange'
) as event_source:
    try:
        async for event in event_source:
            print(event)
    except ConnectionError:
        pass
普通requests请求
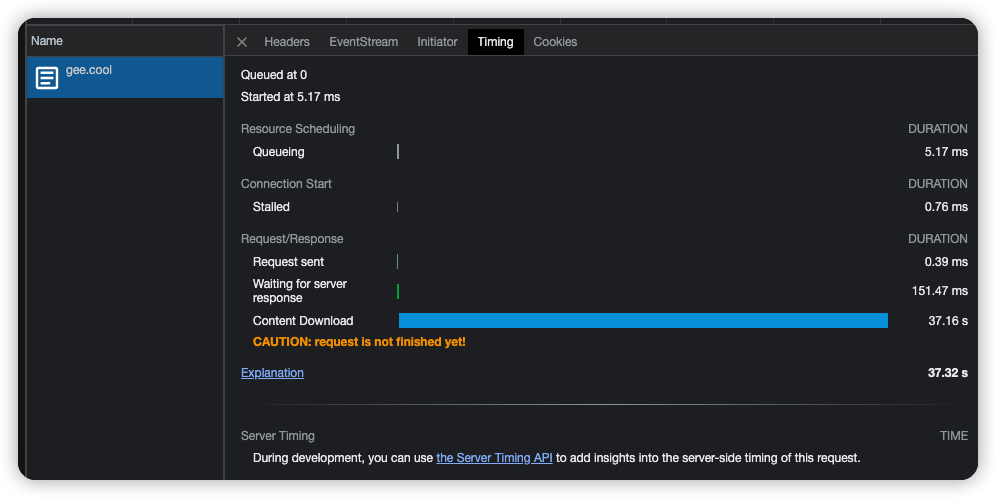
测试获取request的content, 会阻塞直到所有内容下载完毕, 然后才打印出来.
request参数里没有stream, 那么在请求阶段就会阻塞.
request参数里配置了stream, 那么在获取数据的时候才会阻塞直到下载完成.
# request参数里没有stream, 在请求阶段就会阻塞直到下载完成
In [9]: requests.get("http://sse.gee.cool:8000")
Out[9]: <Response [200]>
In [10]: x = _
# 秒出
In [11]: x.content
Out[11]: b'data: 1\r\n\r\ndata: 2\r\n\r\ndata: 3\r\n\r\ndata: 4\r\n\r\ndata: 5\r\n\r\ndata: 6\r\n\r\ndata: 7\r\n\r\ndata: 8\r\n\r\ndata: 9\r\n\r\ndata: 10\r\n\r\ndata: 11\r\n\r\ndata: 12\r\n\r\ndata: 13\r
\n\r\ndata: 14\r\n\r\ndata: 15\r\n\r\ndata: 16\r\n\r\n: ping - 2023-08-16 11:10:31.034691\r\n\r\ndata: 17\r\n\r\ndata: 18\r\n\r\ndata: 19\r\n\r\ndata: 20\r\n\r\n'


# 秒回
In [13]: requests.get("http://sse.gee.cool:8000", stream=True)
Out[13]: <Response [200]>
In [14]: x = _
# request参数里配置了stream, 在获取数据的时候才会阻塞直到下载完成.
In [15]: x.content
Out[15]: b'data: 1\r\n\r\ndata: 2\r\n\r\ndata: 3\r\n\r\ndata: 4\r\n\r\ndata: 5\r\n\r\ndata: 6\r\n\r\ndata: 7\r\n\r\ndata: 8\r\n\r\ndata: 9\r\n\r\ndata: 10\r\n\r\ndata: 11\r\n\r\ndata: 12\r\n\r\ndata: 13\r\n\r\ndata: 14\r\n\r\ndata: 15\r\n\r\ndata: 16\r\n\r\n: ping - 2023-08-16 11:11:41.965043\r\n\r\ndata: 17\r\n\r\ndata: 18\r\n\r\ndata: 19\r\n\r\ndata: 20\r\n\r\n'
java sse
https://www.baeldung.com/spring-server-sent-events
服务端使用 flux
看起来java sse使用flux框架, 实现交互式的输出, 类型为text/event-stream, 每秒发送一次消息.
@GetMapping(path = "/stream-flux", produces = MediaType.TEXT_EVENT_STREAM_VALUE)
public Flux<String> streamFlux() {
    return Flux.interval(Duration.ofSeconds(1))
      .map(sequence -> "Flux - " + LocalTime.now().toString());
}
服务端使用 ServerSentSevent 返回
@GetMapping("/stream-sse")
public Flux<ServerSentEvent<String>> streamEvents() {
    return Flux.interval(Duration.ofSeconds(1))
      .map(sequence -> ServerSentEvent.<String> builder()
        .id(String.valueOf(sequence))
          .event("periodic-event")
          .data("SSE - " + LocalTime.now().toString())
          .build());
}
java客户端与sse的交互
public void consumeServerSentEvent() {
    WebClient client = WebClient.create("http://localhost:8080/sse-server");
    ParameterizedTypeReference<ServerSentEvent<String>> type
     = new ParameterizedTypeReference<ServerSentEvent<String>>() {};

    Flux<ServerSentEvent<String>> eventStream = client.get()
      .uri("/stream-sse")
      .retrieve()
      .bodyToFlux(type);

    eventStream.subscribe(
      content -> logger.info("Time: {} - event: name[{}], id [{}], content[{}] ",
        LocalTime.now(), content.event(), content.id(), content.data()),
      error -> logger.error("Error receiving SSE: {}", error),
      () -> logger.info("Completed!!!"));
}
服务端使用 java spring mvc
使用spring里面的 SseEmitter
@GetMapping("/stream-sse-mvc")
public SseEmitter streamSseMvc() {
    SseEmitter emitter = new SseEmitter();
    ExecutorService sseMvcExecutor = Executors.newSingleThreadExecutor();
    sseMvcExecutor.execute(() -> {
        try {
            for (int i = 0; true; i++) {
                SseEventBuilder event = SseEmitter.event()
                  .data("SSE MVC - " + LocalTime.now().toString())
                  .id(String.valueOf(i))
                  .name("sse event - mvc");
                emitter.send(event);
                Thread.sleep(1000);
            }
        } catch (Exception ex) {
            emitter.completeWithError(ex);
        }
    });
    return emitter;
}
streamlit 使用 websocket
chatglm里的代码,, streamlit构建的chat_mesage, 使用的也是websocket.
https://github.com/THUDM/ChatGLM2-6B/blob/main/web_demo2.py
from transformers import AutoModel, AutoTokenizer
import streamlit as st


st.set_page_config(
    page_title="ChatGLM2-6b 演示",
    page_icon=":robot:",
    layout='wide'
)


@st.cache_resource
def get_model():
    tokenizer = AutoTokenizer.from_pretrained("THUDM/chatglm2-6b", trust_remote_code=True)
    model = AutoModel.from_pretrained("THUDM/chatglm2-6b", trust_remote_code=True).cuda()
    # 多显卡支持,使用下面两行代替上面一行,将num_gpus改为你实际的显卡数量
    # from utils import load_model_on_gpus
    # model = load_model_on_gpus("THUDM/chatglm2-6b", num_gpus=2)
    model = model.eval()
    return tokenizer, model


tokenizer, model = get_model()

if button:
    input_placeholder.markdown(prompt_text)
    history, past_key_values = st.session_state.history, st.session_state.past_key_values
    for response, history, past_key_values in model.stream_chat(tokenizer, prompt_text, history,
                                                                past_key_values=past_key_values,
                                                                max_length=max_length, top_p=top_p,
                                                                temperature=temperature,
                                                                return_past_key_values=True):
        message_placeholder.markdown(response)

    st.session_state.history = history
    st.session_state.past_key_values = past_key_values
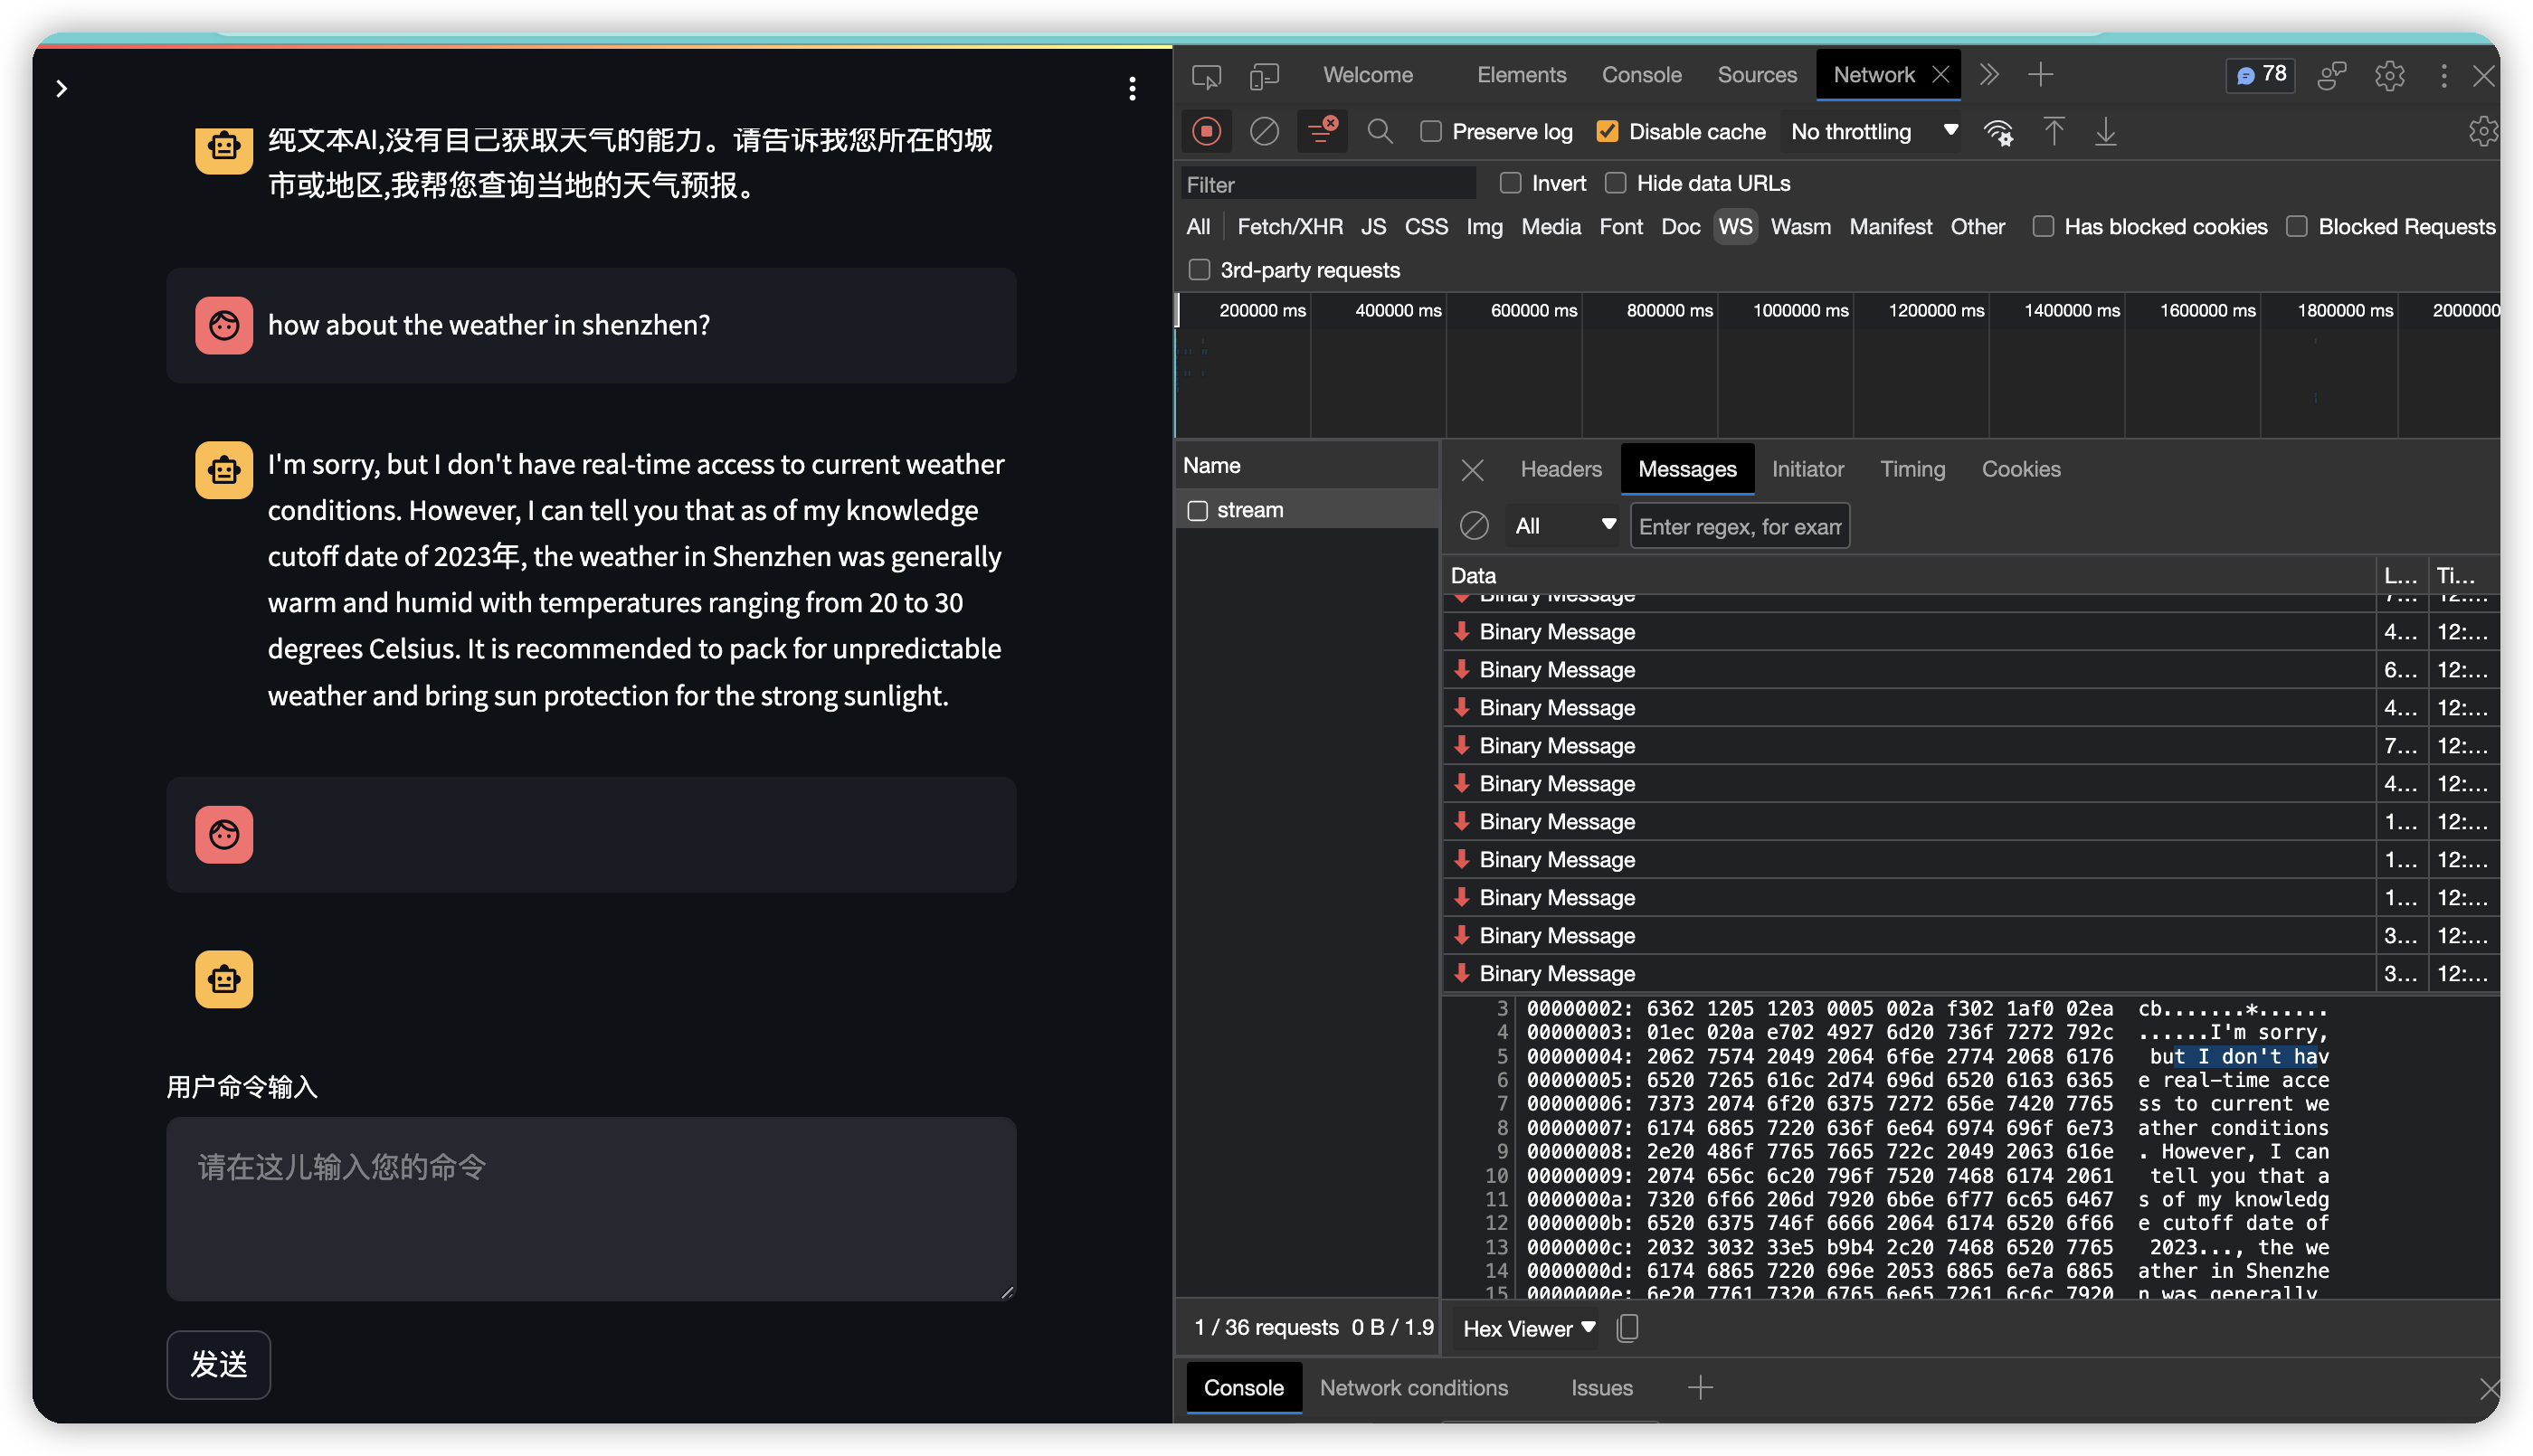
gradio 使用 websocket
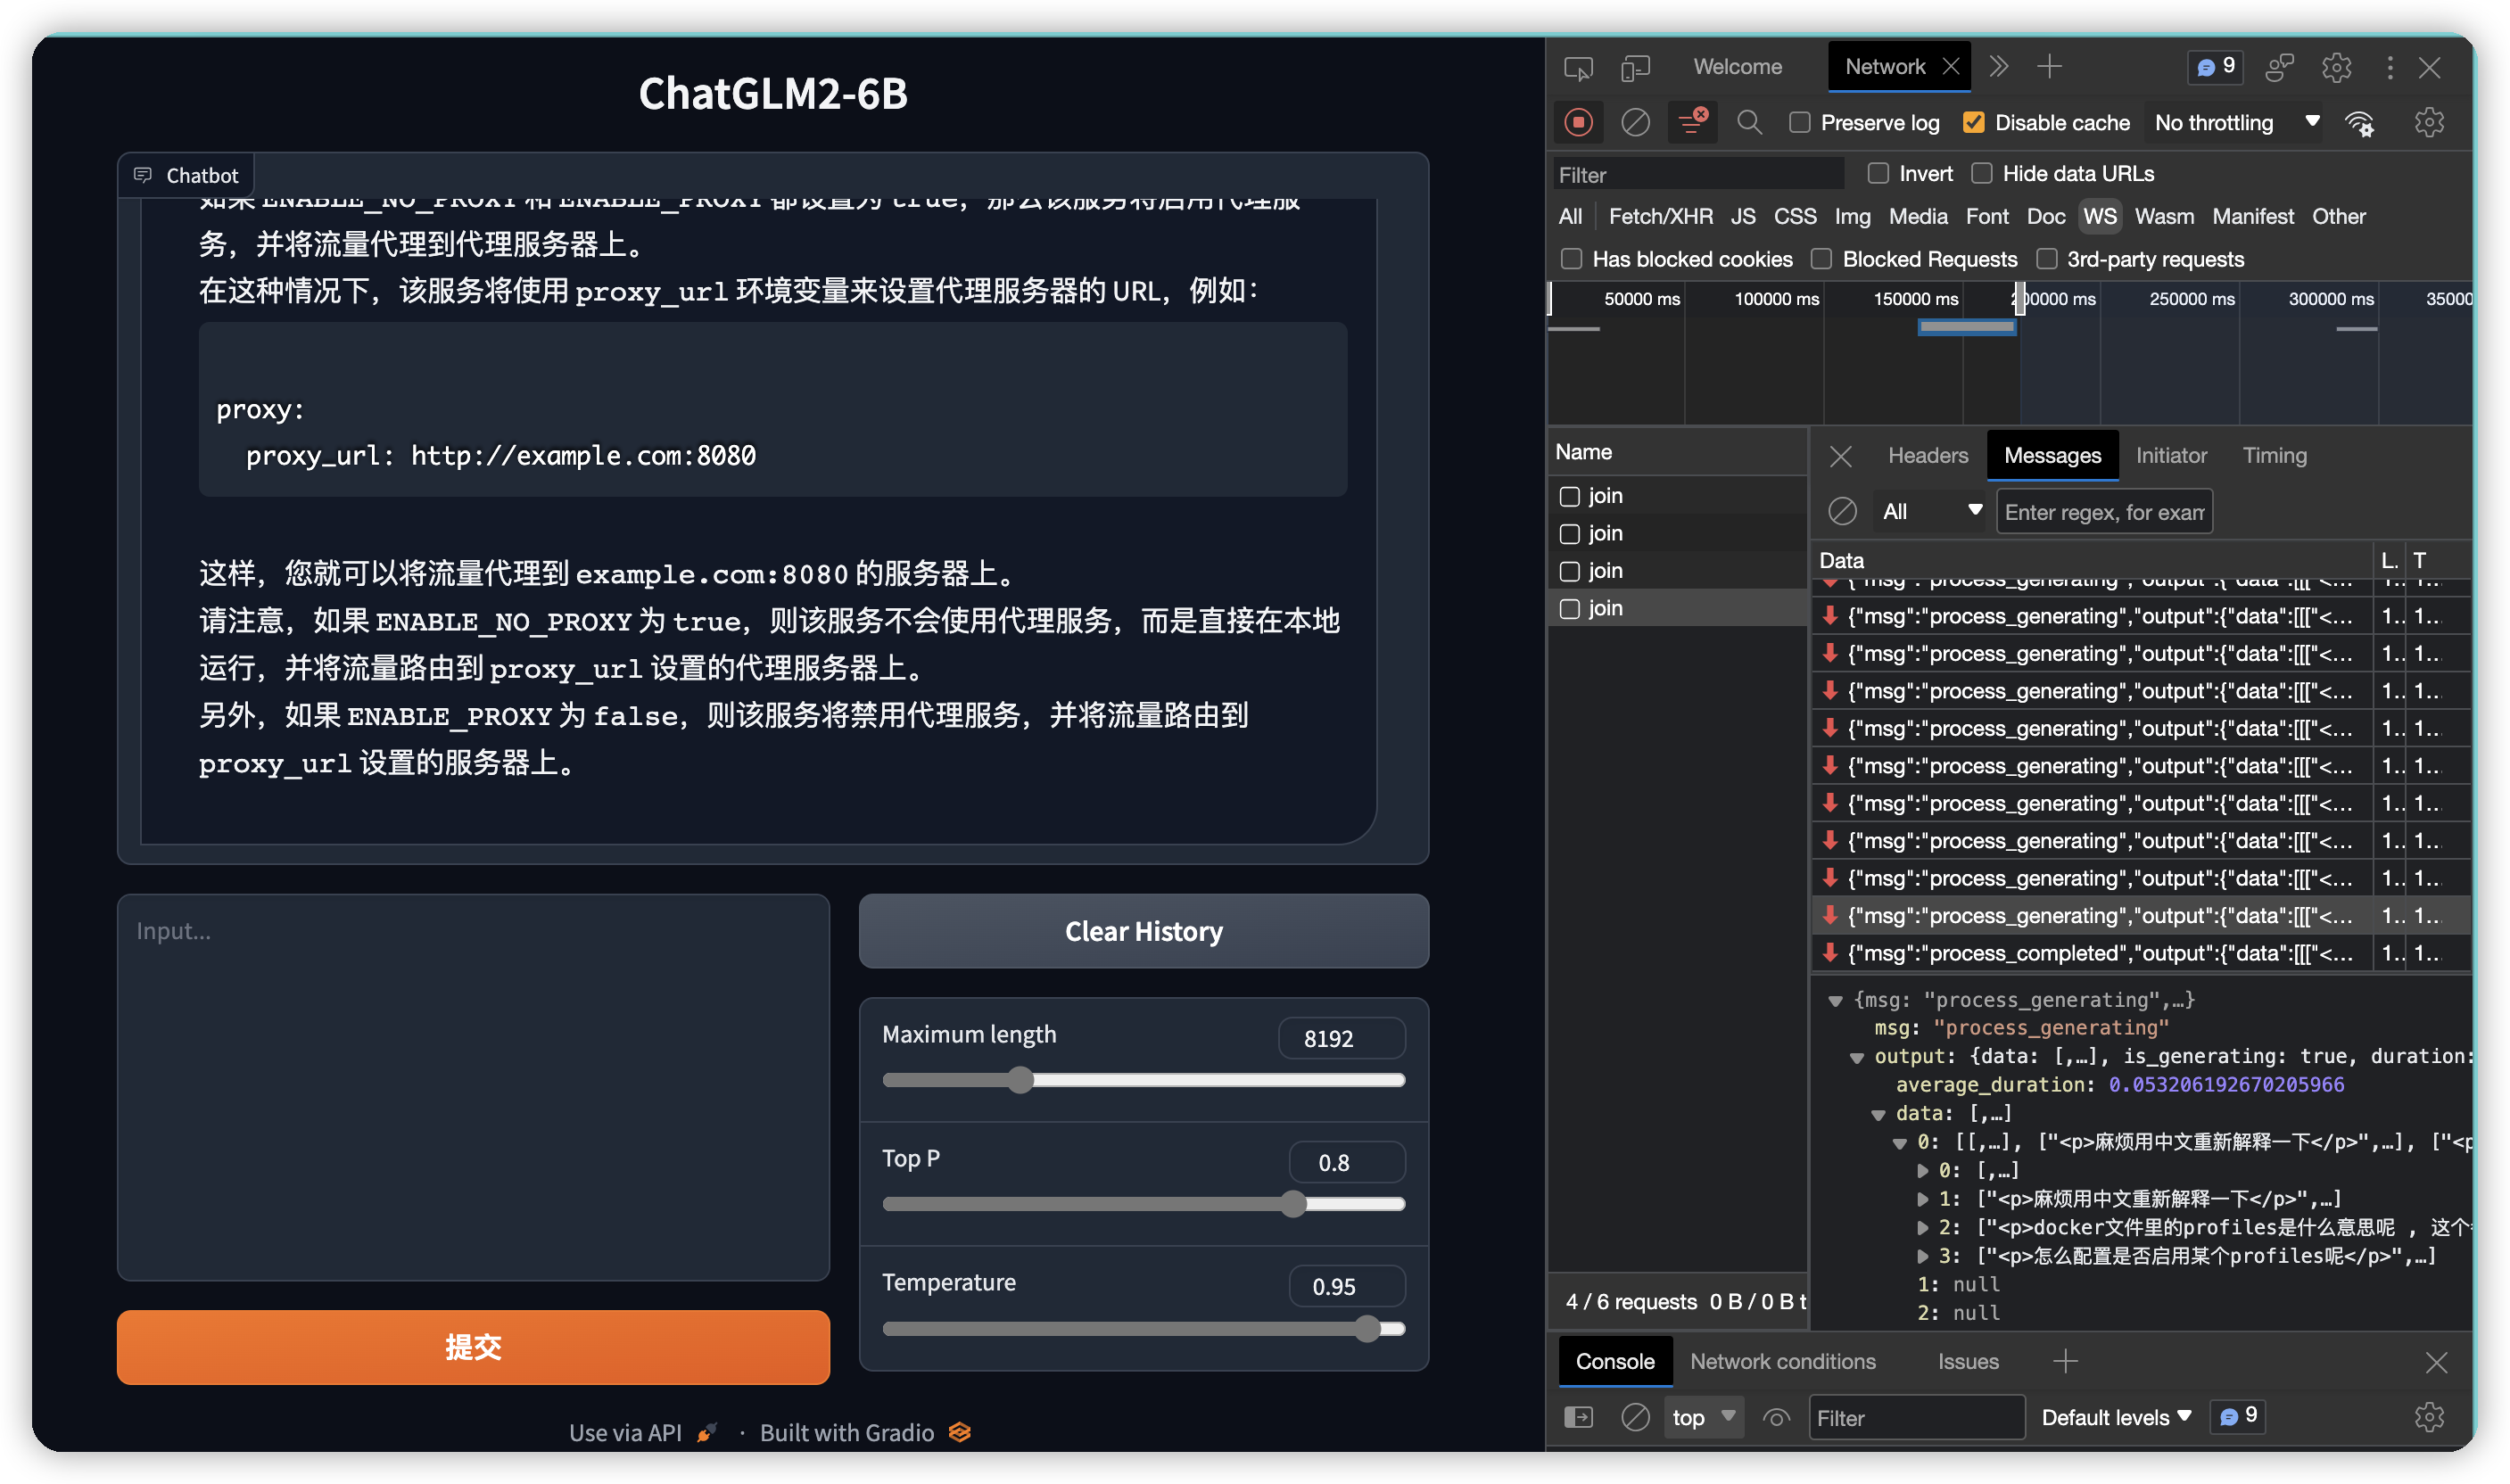
chatglm里的代码, 使用gradio Chatbot调用model交互predict, web效果使用的是websocket.
https://github.com/THUDM/ChatGLM2-6B/blob/main/web_demo.py
from transformers import AutoModel, AutoTokenizer
import gradio as gr
import mdtex2html
from utils import load_model_on_gpus

tokenizer = AutoTokenizer.from_pretrained("THUDM/chatglm2-6b", trust_remote_code=True)
model = AutoModel.from_pretrained("THUDM/chatglm2-6b", trust_remote_code=True).cuda()

...

def predict(input, chatbot, max_length, top_p, temperature, history, past_key_values):
    chatbot.append((parse_text(input), ""))
    for response, history, past_key_values in model.stream_chat(tokenizer, input, history, past_key_values=past_key_values,
                                                                return_past_key_values=True,
                                                                max_length=max_length, top_p=top_p,
                                                                temperature=temperature):
        chatbot[-1] = (parse_text(input), parse_text(response))

        yield chatbot, history, past_key_values


def reset_user_input():
    return gr.update(value='')


def reset_state():
    return [], [], None


with gr.Blocks() as demo:
    gr.HTML("""<h1 align="center">ChatGLM2-6B</h1>""")

    chatbot = gr.Chatbot()
    with gr.Row():
        with gr.Column(scale=4):
            with gr.Column(scale=12):
                user_input = gr.Textbox(show_label=False, placeholder="Input...", lines=10).style(
                    container=False)
            with gr.Column(min_width=32, scale=1):
                submitBtn = gr.Button("Submit", variant="primary")
        with gr.Column(scale=1):
            emptyBtn = gr.Button("Clear History")
            max_length = gr.Slider(0, 32768, value=8192, step=1.0, label="Maximum length", interactive=True)
            top_p = gr.Slider(0, 1, value=0.8, step=0.01, label="Top P", interactive=True)
            temperature = gr.Slider(0, 1, value=0.95, step=0.01, label="Temperature", interactive=True)

    history = gr.State([])
    past_key_values = gr.State(None)

    submitBtn.click(predict, [user_input, chatbot, max_length, top_p, temperature, history, past_key_values],
                    [chatbot, history, past_key_values], show_progress=True)
    submitBtn.click(reset_user_input, [], [user_input])

    emptyBtn.click(reset_state, outputs=[chatbot, history, past_key_values], show_progress=True)

demo.queue().launch(share=False, inbrowser=True)
gradio 设置外部ip可访问
https://discuss.huggingface.co/t/how-to-share-gradio-app-in-my-local-machine/37979/7
demo.queue().launch(share=False, inbrowser=True)
修改为
demo.queue().launch(share=False, server_name="0.0.0.0", server_port=8001)
设置ssl访问
Create certfile:
openssl req -x509 -newkey rsa:4096 -keyout key.pem -out cert.pem -sha256 -days 365 -nodes
and then:
app.queue().launch(share=False,
                        debug=False,
                         server_name="0.0.0.0",
                         server_port=8433,
                         ssl_verify=False,
                         ssl_certfile="cert.pem",
                         ssl_keyfile="key.pem")